Soooo much CO2!

Winemaking Talk - Winemaking Forum

Help Support Winemaking Talk - Winemaking Forum:

This site may earn a commission from merchant affiliate links, including eBay, Amazon, and others.

NorCal

Senior Member
Staff member
Super Moderator
Joined
Apr 18, 2014
Messages
4,014
Reaction score
6,110
Location
Sierra Foothills, Nor Cal
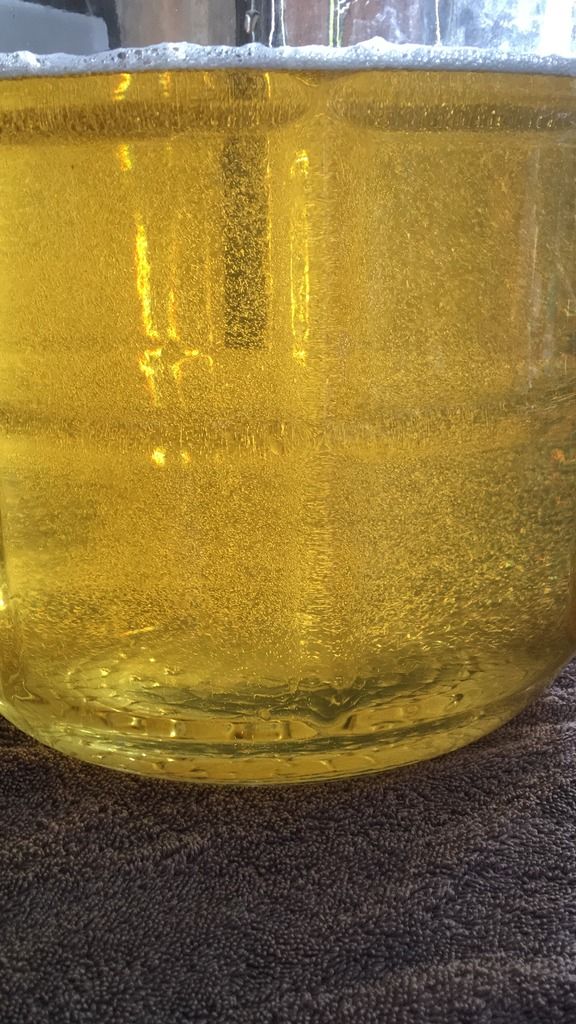
Made Chard from grapes (900 lbs) with @4Score and @Busabill. We each walked away with 3 carboys. We have each cared for in our own way, me with my heavy hands have racked and SO2 it more times than necessary. Right now the wine is really pretty darn good. Has done well in blind tastes with some our favorite chards. I would really like to bottle. Last week I brought the carboys inside for a day and a half, then vacuum transferred 3-4 times in the hopes of eliminating the CO2. A lot came out, but yesterday I took another look at it, filling a bottle up half way and shaking. Sure enough, still gives a puff when the thumb is removed.

My thought now is to use the headspace eliminator and keep a 1/2 filled carboys under vacuum to help rid myself of the nasty bubbles. Any other suggestions?

This is not beer. This is a vacuum rack of the chard.
 
Last edited:
I have used a sintered stainless sparge tip for nucleation, just drop it into the carboy and pull vacuum, you'll see bubbles streaming at lower vacuum levels than if nothing were used. I believe a few oak cubes weighed down with a stainless nut would also provide nucleation.
 
I had very good reviews using the headspace eliminator - using it the way you described NorCal
 
This is not beer. This is a vacuum rack of the chard.

Sure looks like a fine Pilsner beer to me! What is the temperature at? I've noticed that if I can't get the temperature up above 72*F or so it takes quite a few vacuum rackings to get most of the CO2 out. If you have a brew belt or pad it might be worth warming it up a day or two and doing a couple more rackings.
 
Sure looks like a fine Pilsner beer to me! What is the temperature at? I've noticed that if I can't get the temperature up above 72*F or so it takes quite a few vacuum rackings to get most of the CO2 out. If you have a brew belt or pad it might be worth warming it up a day or two and doing a couple more rackings.

It is 58 degrees, warmed it up to 67 degrees and then did my transfers. I guess I should have taken it further.
 
Warm it up to 75 and hook your AIO to it, through a bung with only one hole and just vacuum it til it's free of co2.

I recommend using the headspace eliminators with some additional headspace as it will continual degassing minutes latter after shutting the pump off, then turn the pump back on to down the vacuum pressure again.

I have also used a secondary vacuum reservoir (like a 1 gallon container) to catch any additional foaming.

I also use a reservoir on my vacuum pump, just in case a little foam gets drawn in. Guess the big point was, that you don't have to rack to vacuum out co2....
 
Any idea how much headspace is necessary to have under vacuum and be effective?

You should be able to pull a vacuum with any amount of headspace, but give yourself a little room for foaming. I find a good level is right where the sloped top of the carboy meets the vertical walls. Not too much space to vacuum out, but room for foaming. If you get some foam being sucked into the vacuum tube, just shut it off, let it calm for a few seconds, click it back on. As the co2 gets removed the foaming decreases, bubbles get bigger, and you should be good to go.
 
Also, if the vacuum isn't enough to get the gas to release by itself, whip the wine some first. That will help prepare the gas for releasing under a vacuum. I don't know why that works but it helps. Or slosh the carboy while it is under the vacuum.
 
That is why I mentioned using a 1 gallon for a vacuum reservoir in addition to to the one that is built to protect the pump. Sanitize it and the lines - this way you will have a larger reserve of vacuum to help remove any CO2 without having the pump run continuously. If any foam is created it goes into the 1 gallon container and you pour it back into your carboy.
 
Also, if the vacuum isn't enough to get the gas to release by itself, whip the wine some first. That will help prepare the gas for releasing under a vacuum. I don't know why that works but it helps. Or slosh the carboy while it is under the vacuum.

This works well also - or you can put a marble in the bottom of the carboy. I personally did not feel comfortable rocking a glass carboy under vacuum - I found that vacuum racking with the splash racking cane seemed to work the best and definitely the safest way also.
 
Racked 1/2 off into my mini carboy. The 1/2 empty will come into the house with the head space eliminator on there. I gave it a few shakes after it was evacuated and it was a CO2 festival.
 
Racked 1/2 off into my mini carboy. The 1/2 empty will come into the house with the head space eliminator on there. I gave it a few shakes after it was evacuated and it was a CO2 festival.

I am so glad that it worked for you - I have to be cautious when I tell people to rock the carboy while under vacuum. I picture the carboy being on an unfinished concrete floor - but I see you are on wood - that's all good !
 
Or slosh the carboy while it is under the vacuum.

This is what I do. I fill a carboy 1/2-way, pull a vacuum, and then slosh and rock. (I put the glass carboy on a towel to soften the rocking of the carboy against the floor.) It outgases like crazy!

Note that it is easy to go too far this way. Because the wine continues to bubble for about as long as you do this, I formerly would degas for too long. I made some pretty flat wine this way. It was only later that I realized that, when there is a fairly deep vacuum, a small amount of gas makes a big bubble. That is, I assumed there was still plenty of CO2 in there, based on the bubbling I saw, but each bubble contained only very little gas (because the pressure was low). For a white, you want a little residual CO2.
 
Looks like that's the ticket. Slosh under vacuum, let sit for 24 hours under vacuum. That's good for 2.5 gallons at a time. Hopefully the CO2 will be out of the other 130 gallons I need to bottle this year. I have a couple 6.5 gallon carboys, perhaps I could do 10 gallons at a time (vacuum 5 gallons in a 6.5 gallon carboy). Then I have to deal with the other 50 gallons from the barrel, while I work to degas....

Either way, @vacuumpumpman thanks for the invention, I'll be placing my follow-on order for the degas feature of your headspace eliminator shortly. I notice you don't mention anything about this on your web site. This is an excellent feature.
 
Last edited:
I'm glad it worked for you. Degassing is the bane of my wine making.....
 
I didn't think it was an issue for me; I make wine from fresh picked grapes and age. This is first white, so I get it that I need to degas after 5-6 months. However, I opened a red from last year, which spent 11 months in barrel and sure enough, there was CO2 present. I'm not having any of that this year. I spend too much time and money to not have the wine taste the best it can be.

Steve, @vacuumpumpman, could you make a stopper with just the one way valve? I don't need the balloon, since it will only sit over night and if it did deflate (it's never happened) I wouldn't catch it anyway.

The "CO2 Eliminator"
 
Last edited:
Steve, @vacuumpumpman, could you make a stopper with just the one way valve? I don't need the balloon, since it will only sit over night and if it did deflate (it's never happened) I wouldn't catch it anyway.

The "CO2 Eliminator"

That would be a good idea. My 'balloon' split at the seam on one of my headspace eliminators so now I need to fit the valve to a single hole bung or just let it sit around.
 

Latest posts

Back
Top